Tag Archives: Cara Reynolds

First Flickr and Now This?!?!

[youtube=http://www.youtube.com/watch?v=sDiAD9ezW48&w=420&h=315]

Mensa getting ready for the Apocalypse with a bull’s eye, not bad. :]

Yes my friends we are kicking up our social media game lately. Here is Mushpa y Mensa’s new fun filled YouTube Video Channel where we showcase our how-to videos, La Mushpa y La Mensa having fun, going on amazing adventures, mini documentaries, hilarious hijinks, and whatever else we are moved by.

[youtube=http://www.youtube.com/watch?v=HAlzEqUgYRI&w=420&h=315]

18 meters back I am the only woman to make the target and 1 out of 3 to hit it at all. :] I’m just sayin’ ;-] Apocalypse here I come!

For your entertainment there will also be a million playlists of sweet jams, serious segments, comedy, save-the-world videos among many others. Be ready for the Mushpa y Mensa visual art experience.

Much love,

Mushpa

Flick This!

Ladybug
Ladybug Love

We here at Mushpa y Mensa had an Instagram (which is owned by Facebook), but decided like Facebook, it is a tantamount waste of time and a way for a large group of people to convince others that their lives are more exciting, interesting, happier than going out and making it true. Not only that, but people should be aware how Facebook makes most of their money is by selling your information. Not through ad clicks and charging people with business pages money to have their posts reach ALL their “Fans” and “Friends” as you may believe.  Listen, I want to live my life not spend hours stalking others’ make believe life or promoting my own better than reality life. Been there, done that and every time it left a bad taste in my mouth. Thanks to Mensa pushing us we have been Facebook free for almost a year now and I have yet to miss it. Not surprisingly, I accomplish much more without it, so to my friends who tell me things like, “You would have known I was out of town if you had a Facebook“. I say call me, email me, hangout with me as I am never going back!

Next, people are always asking us if we have a Facebook so they can “Like” the Mushpa y Mensa page or link back to us. When we answer no they seemed shocked like for sure we will never be a success without Facebook or it will be soooo much harder. I find that to be a misnomer. We have already had movie stars, a big time movie producer and a composer of modern day operas among multitudes of other amazing human beings love and buy our art in the last 8 months since opening. We believe in ourselves, our art and the idea that if you do the work and right thing the Universe will always reward you and thus far it is working. I have asked other people with businesses and Facebook pages how much business it has generated for them and the results are nil to nothing. That says more to me. Honestly, you can’t use something bad to achieve good, that’s just the way it is.

Let me stop and get to the real point of this blog entry. Maria Emilia and I want to be able to take pictures and post them somewhere instantly, link back to them in our blog posts and document our journey through photographs of the making of Mushpa y Mensa, without using Instagram, so how can we? Flickr!!! Yes, ladies and gentleman we have a Flickr account now full of our fantastical photos!!! :] There are photos of our amazingly unique organic tees, of the fleas, fairs and markets we’ve worked, photo shoots, crafting, us and whatever else our little hearts desire. Go look at it and tell us what you think? I am so excited!

Never forget in life there is always a workaround, so don’t get stuck.

Such Love

With so much love!!!

– Mushpa

Mini-Sewing….A Teddy Bear From Scratch

I went to visit my family this week in VA, and of course there had to be craft time with my small siblings. What better thing to do than sew a stuffed animal with Isabela’s mini-sewing machine!

diy kids sewing patterns

It’s no industrial serger, nor does it even come close to stitching zigzag or reverse stitches….but it gets the job done! It was actually trickier to figure out that my own machine! After getting to know it though, Isabela, Abuela and the rest of the crew (aka Juan Lorenzo) sat around the dinning room table learning step by step how to make a little bear.

Steps we took.

1. Isabela sketched out a simple drawing, including the fabric that she would use for the body, tummy, ears and face or her bear.

2. We drew a simple pattern for the bear and she cut it out and pinned it to the fabric. She cut the fabric and began to pin the pieces together.

diy kids sewing

3. We found some old clothes, y la Abuela helped us cut out pieces of scrap fabric to use as stuffing for the bear. We also heard stories of la Abuela’s first sewing machine, which was operated by foot, and later adapted to sew with a small motor inside. : )

diy kids sewing

Then the sewing began….

It got a little tricky at times, but Isabela got the hang of it pretty quickly.

kids sewing

4. Finally we found some nice smelling tea leaves to stuff in the bear to give it a nice smell, and she closed  and hand-stitched the body and head together. Y listo!

Isabela made a bear, and Juan Lorenzo filled the cushion with pins and “sewed a tomato!”

If you mold kids minds, and teach them how to make their own toys, dolls clothes and whatever else their minds come up with, you will be surprised with what they can do! I was definitely impressed.

: )

-Mensa a.k.a. “Memi”

I Say, Stay In Air!

EASY PEASY!!!

So a really easy and fast way to make a draft stopper for when you have the AC on and you don’t want it to leave the room in the summer, or you are stopping the chilli air from coming in into your warm home during the winter months.

Draft stopper DIY

Here’s whats up.

1. Find a long thin bag. Like a newspaper plastic bag. I got mine from staples where they stuff large prints in thin plastic bags. Fill it with rice and knot it/tape it on the ends.

DIY draft stopper

2. Measure around and trace a handmade pattern on a sturdy fabric that will not rip easily. I re-purposed fabric that I am using in my backpack project. A rectangle is straight forward and easy, so you won’t mess up.

DIY draft stopper

3. If you want, use a larger stitch (around 4) so you can flip it and see if it fits in your case. Once fitted, sew over the stitch with a smaller stitch and finish it off by sewing the ends and VOILA!

DIY draft stopper

Like I said…Easy peasy!

-Mensa

Funny Che

When I see advertisements like these, a couple of things happen…

1. I laugh-cringe which is not giving me any joy particularly, but rather has the same effect as when you see someone hurt themselves really bad in those funny home video shows….it sucks and it’s not funny, but the human being sometimes handles it with laughter.

2. I get angry, because this is not a joke. Holy shit, this is real.

3. And finally I get scared…because the “activists and revolutionaries” are getting 15% off the entire store, and they are buying it…….

Ironic and funny che

Let’s keep fighting against this surreal funny home video until the end.

Hasta la victoria siempre…

Mensa

Making some Organic Mayo….with Coconut Oil

We bought a jar of coconut oil at the super-market the other day.

It was a bit hard to find a good use for it because even after trying some recipes, it of course didn’t behave like the olive oil which we use regularly.

I did use it as a hair mask, which was nice, but there was still a lot left on the jar….

So out came the idea to make Mayo with coconut oil. I looked up some recipes and it is totally possible and doable.

homemade coconut oil mayo

We used…..

  • 1 whole egg
  • 2 egg yolks
  • 1 tablespoon of fancy mustard
  • 1/2 a lemon’s juicy juice
  • a good pinch of salt
  • some pepper
  • 1/2 cup of Organic Coconut Oil
  • 1/2 cup of nice Extra Virgin Olive Oil

Disclaimer.… if this is your first time making mayo (like it was mine), be careful and do it EXACTLY as the instructions tell you… After you learn, then you can experiment. I  should have done so…


homemade coconut oil mayo

Do the following:

  • Mix your two oils together.
  • In a food processor, blender or bowl (if you are hand whipping with a whisk grandma-style) mix the eggs, yolks, mustard, lemon juice and condiments.
  • After all is nice and even start adding DROPS of oil to your mixture and continue the blending and whisking process. *** this is where I messed up***…If you add the oil too fast, the mixture will curdle and you’ll end up with oily egg juice… So sad.
  • Keep adding drops until it turns a lighter color…you will be able to tell if they start mixing well.
  • SLOWLY add little streams of oil and continue to blend…and just keep doing it slowly, oh so patiently…
  • After you are almost done with the oil (about 1/4 cup left) you can speed it up a bit if using a blender, and add the rest of the oil. It should start to become a heavier mixture….continue on until its silky smooth.
  • Let it set for 30 minutes in the fridge.

homemade coconut oil mayo013-06-25 12.09.14

*** IF YOU MESS UP***

I saw many posts and recipes say how you could not save your mixture if it curdled….NOT TRUE!  You can mess up and still have delicious mayo!

Since I had done it the first time in the blender and messed up, I decided to hand-whip it.

homemade coconut oil mayo

I added another egg yolk in a bowl and whipped it….and to that base I started to add the droplets of the curdled mix slowly, whipping it by hand. I followed the instructions clearly this time, and poured the messed up mixture in without having to throw it away! And it worked!

FANTABULOUS Home-made, coconut oil mayonnaise.

Since it’s home-made, with NO preservatives and whack ingredients, it only keeps in the fridge for about two weeks or less….but its worth it!

YUMMMM……

-Mensa

Love is Love

[youtube=http://www.youtube.com/watch?v=hlVBg7_08n0]

I can’t change, nor do I want to. Love is love, strangers may judge, but family should stand by each other in times of struggle and change, not just for the times when life seems easy, but for those times when we need them most.

Label me as I do and as you label others. Just as we have pride in being a Latina, Black, Brown, Greek, Jew, left-handed can we not have pride in who we love. I am truly blessed to love who I love and trust me I am loved by the universe as well. I see it everyday.

My love keeps me warm.

I am free.

-Mushpa

Out with the Old…In with the Re-vamped!

So my backpack was on its last strides… I have had it for seven years and it has served me well. It had been to many places around the world, including little towns in Italy, many Christmases in Ecuador, and it carried everything from heavy college books, community organizing flyers and papers as well as our regular weekly groceries. She was definitely a trooper.

So now I need a new backpack…. And what better way to keep it real than to bust one out yourself! So instead of buying a bag, I’ve decided that I will make it! Not from scratch, BUT I will re-vamp a small bag I had,. I’ll add  a couple of pockets, new heavy duty straps, a new flap with velcro….all done with my little hands!

So far it’s been a challenge. I didn’t think it would take so long….but it is not as complicated as it seems.

I had the foundation….

DIY Backpack

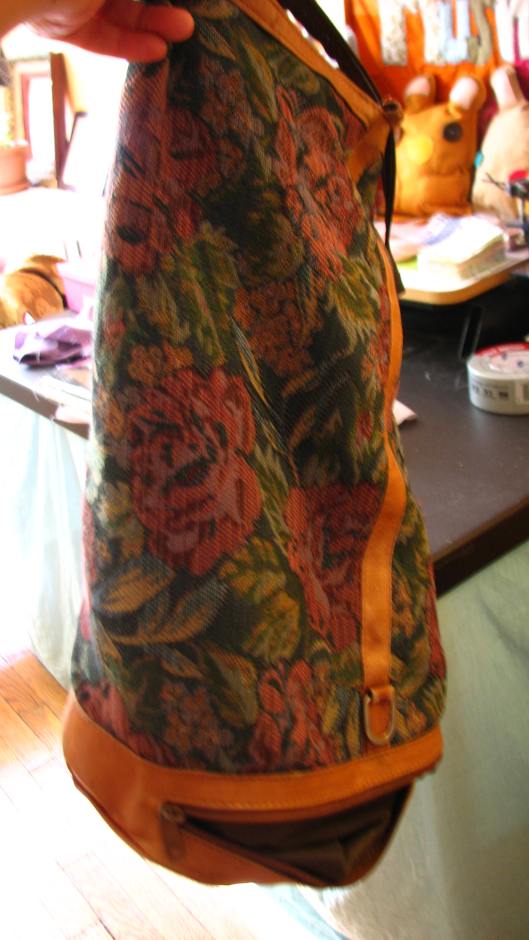
It’s a backpack with “ugly grandma fabric” but I think it is still very cute. I exchanged it with my sister in a clothes swap. It had a funny zipper an the straps were broken down from so much use.

DIY Backpack

I measured everything and sketched out a drawing of what it would look like with approximate measures.

The seam-ripper was my best friend for a couple of hours….while I un-did the previous straps, the zippers and the lining in order to have full access and revamp all the necessary details.

DIY Backpack

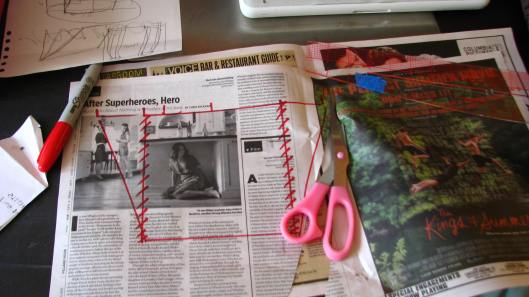
Since I had the foundation, I cut out patterns for the POCKETS, the FLAP, and the STRAPS. I didn’t use an offical pattern for the pocket or flaps, and I instead free handed the drawing making little updates as I moved along! I did use a pattern online for the straps through, and drew with the measurements given the two straps using newspaper.

DIY Backpack

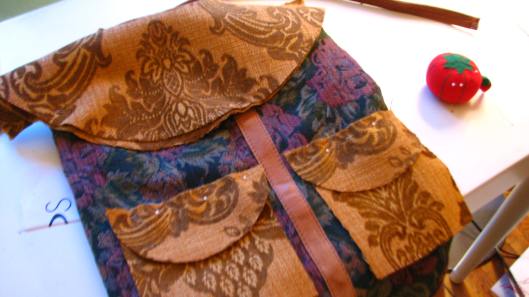
I cut out all the main pieces and placed them with pins to see what it would look like…. it’s resembling something fancy now!

DIY Backpack

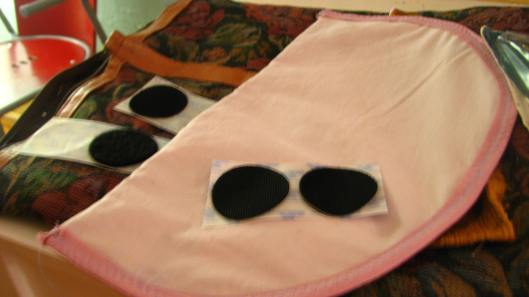
Using some bias tape, and an old pillow case for the lining, I finished the main flap, and the small pockets…. and so far its looking good.

This is the first update, but I will post the finished product once I am done this week.

Mushpa and myself have been having conversations about a bigger and better project in relation to this backpack. We have been asking ourselves…. Why not make it?

If I need a backpack….and we have the capable hands and tools to make it ourselves, then why not make it!?

It makes sense, right?

Now on to the finishing this beauty….

Until next time!

-Mensa