Category Archives: DIY

Art Session at Dare Devil Tattoo


So remember how Mushpa is getting a tattoo? Well here is the first session!

We went to Dare Devil Tattoo, where Michelle Myles took the original design and adapted it to make it fit around the already tattooed fairy.

The frame was made smaller, and it fits perfectly in her arm!

tattoo rococo frame with fairy

Ouch! Two hours of a needle piercing through your skin, all while having a casual conversation about old movies and what not.

And there she is all happy and bandaged up!

tattoo rococo frame with fairy

After cleaning it up, the close ups look nice! So far the outline is done, and it is so exciting to finally see this actually on skin rather than paper!

tattoo rococo frame with fairy

It is still a little red, so she has to give it some time to heal up enough to begin the shading…

tattoo rococo frame with fairytattoo rococo frame with fairy

I cant wait to see it finished! In a couple of weeks she will have the final piece all done!

Sweeeeet!!!

: )

-Mensa

Homemade Clay: An Inconvenient Truth…

So you try to be conscious and it ends up you didn’t do much better than you originally thought you would.

I looked, and searched for home-made clay recipes all over the internet. I was looking for a clay that would be malleable yet durable enough to make beautiful things, cheap enough to produce and make over and over again, and a recipe that didn’t use nasty or toxic ingredients.

homemade polymer clay

And I found one! It was perfect….or so I thought.

The ingredients?

-1 cup of Non-Toxic Elmer’s glue

-3/4 to 1 cup of Corn Starch

-2 tbsp of mineral oil  Olive Oil

-1 tbsp of lemon juice

homemade polymer clay

Not so toxic, right?…. Well, I looked into what mineral oil really is, and essentially it is the “by-product of the distillation of petroleum to produce gasoline and other petroleum-based products from crude-oil”. That same oil in the clear bottle and the pink cap that you put on a baby’s bum bum, that stuff (plus some fragrance), comes from an incredible unsustainable source. On top of that fun fact, the World Health Organization  “classifies untreated or mildly treated mineral oils as Group 1 carcinogens to humans.” (Source) Group 1 carcinogens = DEFINITELY CARCINOGENIC TO HUMANS. What?!?!

So since I am being all aware and into this, I decided to replace mineral oil with OLIVE OIL!

homemade polymer clay

Cool… That’s great. So I am happy I’ve done my research and I feel better about myself.
I go about following this recipe, which at first I was hating, because it did not come out like it said. After reading the comments from other people though, I cooked the dough longer and realized that the most crucial thing is to KNEAD the clay when it’s REALLY HOT. Then all the parts will blend.

ps. I also added turmeric to the recipe to give it some natural color.

homemade polymer clay

But then something else happened…another question that should’ve been obvious to ask, but I did not. Where the heck does Elmer’s glue come from???

Oh here we go again….. Elmer’s glue is made of polyvinyl acetate which, you guessed it, comes from petrochemical sources. Come on world!!! Really? Which really makes me think about all the “non-toxic” things we buy, that are actually quite toxic to our environment, our bodies, and our world! Of course elmer’s glue is toxic if it’s source and main ingredient when extracted from the ground  pollutes and kills everything around it!

Agrrr… I’m not so happy about this at all. I want to be able to make my own clay/dough at home, with decent ingredients that won’t harm you and me.

homemade polymer clay

I haven’t experimented again, but I will once I find the perfect ingredients.

In the mean time, I will try to use up all my “non-toxic” glue, and try some more natural glue recipes. And lesson learned. Check ALL ingredients and where they come from regardless of now “natural” and non-toxic they are.

-Mensa


Corks! What To Do With Them?…

This is an idea I came up with last night after making a couple of pieces, which by the way will soon bee buzzin’ at our Etsy store!!!)…

cork DIY home made idea

These little corks have been sitting in this little chinese take out food box for months, and nothing has really inspired me to use them. Yes there are a couple of cute ideas out there, but nothing really moved me, sabes?

Until I went into an o.d. organizing frenzy of the jewelry-making boxes…

Got some messy string?

messy string? use corks and organize!

Wrap them around some champagne corks! (We got some at a wine shop. They collect them sometimes,  and we asked if we could take some and they said sure!)

Make sure to make a slit on the side and on the top so you can catch the string and it doesn’t become lose. I used an x-acto knife.

And now they are organized, they look nice, AND I found something to do with these corks! Fiu!

corks DIY

Nice!

Shall we celebrate and open a nice bottle of wine now?

-Mensa

Re-Vamp your Ikea Lamp!

So yes, I admit it. I have been sucked in by the Ikea vortex plenty of times.

 I have bought several items at Ikea which I have been pretty happy with. Sheets, place mats, cups and a recycling bin, as well as other random things that we needed for the house.

orgel lamp ikea diy

It is affordable and they have a pretty decent mission and vision about how such a profitable and huge corporation should go about in doing decent business practices. I am sure that they are making their good $$$ with Ikea stores all over the world, and with such hype that comes with it. Unlike nasty Wal-Mart and other super stores though, they do try to promote a sustainable life at home, they are pretty conscious about their energy & resources, and they try to partner with organizations in order to help communities and people with their ongoing success. If all businesses had their same practices, we would be in a better place today. It doesn’t mean they are doing it perfectly, but it is a start.

BUUUUUUTTTT….. there’s an issue with buying from Ikea….many people shop there too. I even saw my sheets in a movie set once! Ah! Not MY sheets!!!

So what to do?

Last night I was waiting for Mushpa to get home, and I felt like I needed to work on something light and fun. And that’s when I remembered the Ikea lamp in our bedroom….

So generic, so cost effective, and so…….plain? So I decided to do a little Ikea DIY and update our lamp. Since the lamp shade is made of thick paper, I decided that I could use some water colors to give it a nicer look.

Some mustard-ish orange and a pretty pink. Ta-da! Not so generic anymore right?!

orgel lamp ikea diy

Now it looks like a tequila sunrise in our Mediterranean blue bedroom!

Fun times! : )

-Mensa

Guess What We Have Now???

StumbleUpon

We are the proud new owners of a Mushpa y Mensa StumbleUpon!!! You know what we don’t have? Any followers… :[

FOLLOW US!!!!!!!!!!!!!!!!!!!! 😀

Please and thank you.

-Mushpa

Tea Tree Oil: Magic Potion or Poison?

tea tree oil

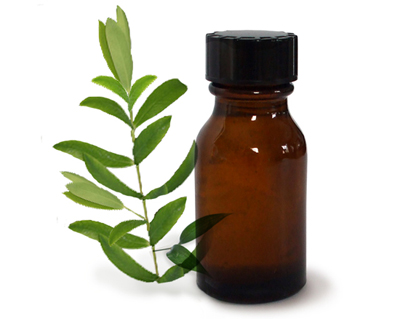
So the other day we noticed that we have in our home tea-tree oil infused goodies. Our shampoo, our conditioner and we use tea tree oil for unwanted, unhappy pimples. And it really does work! I had heard this little essential oil had many purposes, but who would have known it was crazy useful for everything! From pimples, to cleaning to Woohoo! Everything… Maybe I should ditch everything in my medicine cabinet and buy a lifetime supply of tea-tree oil!

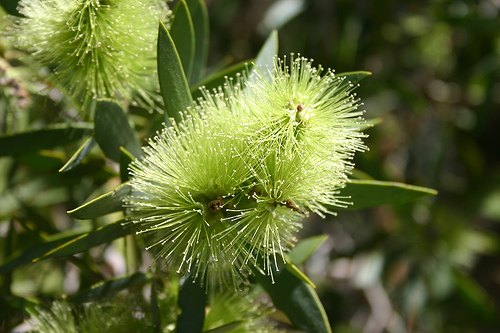
So where does it come from? Australia. From the plant Melaleuca alternifolia.

tea tree oil

What can it be used for? A MILLION THINGS!

  • Analgesic
  • Antibacterial
  • Antifungal
  • Anti-infectious
  • Anti-inflammatory
  • Antioxidant
  • Antiparasitic
  • Antiseptic
  • Antiviral
  • Decongestant
  • Digestive
  • Expectorant
  • Immune stimulant
  • Insecticidal
  • Neurotonic
  • Stimulant
  • Tissue regenerative

tea tree oil

Got Acne? dilute with water and use for an overall treatment, or dab a very small amount on acne breakouts.

Got Allergies? You can massage it into the chest, abdomen or “the reflex points of the feet”

Stinky Feet? A couple of drops and soak your feet in, or massage directly.

Canker soar? Apply a dab!

Clean Freak? Add a couple of drops  to your home-made everyday cleaner.

Stuffed nose and congestion? Boil some water and inhale steam infused with some oil. Minty smell will clear you up!

Cuts, Scrapes or Burns? Disinfect it with a slight diluted solution and cleanse infected areas with a one drop to one cup of water mixture.

Getting Pierced or a Tattoo? Use it undiluted to avoid infections.

Anything else? Yes! Also vaginal infections, warts, wounds, nail infections, dandruff sunburns and rashes!

BUT…I ran into this article that says that tea-tree oil might be potentially toxic for your cats and its bad bad bad…so I decided to look into it a bit more.

poison

Yes, if you swallow and ingest a slight amount of this oil, it could harm you.  The National Capital Poison Center says they get twice as many calls regarding tea-tree oil poisoning than any other oil. Yet, they are not specific about their statistics so its hard to compare.

There are two statements that they make that I think are significant and should be taken as precaution when using this mighty oil.

1.

“Tea tree oil and pets: Veterinary toxicologists have reported that large amounts of tea tree oil applied to the skin of cats and dogs caused poisoning. Symptoms have included muscle tremors, weakness, difficulty in walking, low body temperature, and excessive salivation. With pets, as with people, following label instructions is essential.”

2.

“Non-medicinal uses: …  “natural” does not necessarily mean “non-toxic” or “non-poisonous”; tea tree oil is irritating to some people and is poisonous to swallow….There is some scientific evidence that tea tree oil can be effective for certain skin conditions. It is poisonous if swallowed and so should not be used in or around the mouth at all.”

The second point should be taken with more consideration because when I did my research I ran into information regarding its use as a mouthwash, canker sore, cold sore and cavity prevention oil. Many people have used it around and within the mouth and promote such uses, so I don’t think that the likelihood that you will turn up dead will be high….BUT I would use it with precaution if you are allergic to any other oils, if you are pregnant and if you have other conditions which you already need to take extra care for.

So is it a super oil with multiple amazing uses? I’d say so!

Am I going to party hard with my cat and take shots like it’s peppermint schnapps?  Probably not….

fashionable cat

Does it smell very very good and is better than buying fifteen different products to cure many things? YES!

If you would like, you can check out some sources below to get more descriptive and detailed uses for this mighty essential oil as well as people’s concern with it.

Sustainable Baby Steps, Medicine Net, General Info, Toxic to Cats

What!? What!?

-Mensa


3 Ingredients: All Natural Every Day Cleaner

We made our own all purpose house cleaner with 3 ingredients we have at home. It will save us some $$$ and it is super environmentally conscious, AND its as easy and cheesy as 1, 2, 3!

One:

Dont throw away your old cleaner’s spray bottle!

Keep it, and fill it half way with white vinegar.

vinegar

TWO:

Fill the rest of the bottle with all-natural tap water! ; )

water bubbles

THREE:

Add about 5-10 drops of essential oil. We used peppermint because it smells oh-so-fresh, but you can do anything from lavender to patchouli!

Peppermint essential oil

THAT’S IT!

You can use this anywhere and everywhere, and according to The New Homemaker there is dozens of combinations that you can use vinegar with to clean everything from your laundry to removing stains and odors!

So why bother buying “green” cleaners when we can make them at home!?

So do it now!

love,

-Mensa

Oh-Organic Marshmallow Fondant, Where art thou?

Feliz cumpleaños Micaca y Isabela!!!

This birthday cake is dedicated to my crazy cool sister who turned the double douces a week ago…An easy to make fondant added a little color to this delicious chocolate cake, and who doesn’t love fondant? You can really make anything you want with it because its almost like play-dough!

The fondant was ridiculously easy to make, and because of the hype with the marshmallow-fondant recipe, I got caught up in the moment and used ingredients that were not so wholesome for our health. So sorry hermana!

image-2

So the ingredients I used?

Marshmallows= High Fructose Corn Syrup and who knows what  bits and pieces of chicken parts…

Powdered Sugar= I didn’t use any organic or unbleached product…my bad.

Food Coloring= Need I say more?

So here’s the deal. I did a little research and Organic Marshmallow Fondant IS possible.

I found a couple of recipes, yet each of them always had something “off”. So i combined all my research and I think it will be as easy to make an organic fondant recipe without the extra hassle.

So here’s the recipe…

8 oz of mini VEGAN marshmallows (about 4 full cups). They do exist!

1 tbsp of water

1 pound bag of Wholesome Organic Icing Sugar..plus a little bit more for when things get sticky!

1 tbsp of Organic Light corn syrup

1 tbsp of lemon juice

Natural Food Coloring

Organic Butter

* For the Food Coloring there are MANY options. You can buy organic and natural good coloring like Maggie’s Naturals which are made of all natural plant based sources. Your local natural food store should carry some. If you want to experiment and make your own colors you can virtually achieve any of them with any product at the store. Red? Use some beets! Orange? Carrots! Yellow? Tumeric or saffron flowers. Green? You can use spinach or even buy a natural food supplement called liquid chlorophyll. Blues and Purples? Cabbage anyone? Its doable! You might just have to experiment with the recipe.

image-5

The HOW TO:

Add the water to the marshmallows. It usually calls for a minute in the microwave. Skip this step and the extra radiation and heat it the old school way. I will update this recipe when I try it in the oven, but I would start by testing it at 300 degrees for about 10 minutes in a bowl.

Use a WOODEN SPOON covered with butter. This will make the marshmallows stick less to everything and will make it easier to mix. Make sure all the clumps are gone until you have a pretty smooth marshmallow mixture, and add the corn syrup and the lemon. The corn syrup helps make it a bit more flexible so it does not crack and dry so fast, while the lemon reduces the intense sweetness it has.

Start adding the icing sugar bit by bit, and continue mixing it well into the marshmallow mix. Slowly it will start to clump up and it will become hard to keep going further with the spoon. Once you have gone through 3/4 of the sugar, you can transfer the mix to a clean surface and use your hands.

Knead and keep adding the powdered sugar until you have a smooth and malleable dough. If it’s too sticky add a bit of sugar, if it’s too dry then splash water into your hands and knead again.

To prevent it from sticking to the table and the rolling pin, I greased the surfaces with a bit of butter which made things much easier.

image-3

I made some flowers and leaves. Pretty easy! For the leaves I just cut two different shapes and with a toothpick added the lines. For the flowers I used a long flat triangle and started to curl it up from the smallest end. The colors look extremely bright, because they are extremely fake.

So now that I have the recipe and sources, I will make a second attempt to live to what I preach, and make a HEALTHIER and more CONSCIOUS birthday cake, with beautiful organic and natural colors!

image-7

 -Mensa

Re-potting and Re-loving your Plants

I must admit. I need to be better about taking care of our house plants. So today I got serious! I decided to re-pot them, mix the soil around, add new soil and a little home-made plant food.

The How To’s:

1.Making the Plant Food:

Since we recently started composting, I figured that instead of buying any plant food from the store, I had to put our compost to good use.

image(7)

In a blender I added some coffee grinds, a couple of eggshells, and some compost (which included apple cores, carrot peels and other goodies). I added a healthy amount of water and blended it.

A word about plant food:

Many home made recipes call for a mixture of  Epson Salts, baking powder, regular salt, and household ammonia. Whatever rocks your boat. Personally, adding ammonia, which is considered to be a toxic substance, to anything seems a little crazy to me. Its a natural and organic compound produced and used for growth of many plants, but having a jug of ammonia in the house does not seem like the best and most eco-friendly solution. (If it gets in our water ways it can be extremely harmful). So sticking with all-natural, non-toxic, home-made plant food seems like a better solution to me.

image(5)

2. Mixing the soil

I took old soil from plants that had died due to extreme heat in our kitchen (whoops) and mixed it with new soil in a bucket. I tossed it and added a bit of the juicy plant food (mostly the water part) to moisten the soil. I added more water to the mix in order to have the soil thoroughly moist.

3. Re-potting your plants

***The most important thing I did through out this whole process was talking to my plants! Call me crazy, but I really felt like they needed to know what was going on. Imagine being pulled out of your warm comfy home and abruptly placed in a new pot! So as I did this I explained the process, was really gentle, made them feel more at ease, and made ME feel like I knew what I was doing (even though it was my first real re-potting experience!)…So it helped us all : )

-Start by having everything ready and clean. I made a mess, so cleaning as you go is definitely recommended.

– Prep your flower pot with a little dirt at the bottom. If there is a hole you can cover it using a shard of an old broken pot making sure you don’t cover the hole completely. Add a bit of the plant food that you have prepared.

image(6)

-I took my first plant and flipped it gently until it loosened and came out of its pot. I dug a little around the edges and it helped to get it out. I untangled the roots a bit and watered them slightly and placed it on the pot.

-I covered and filled the pot with dirt and half way through I added a bit more of the plant food. Then I covered it completely, making sure I stayed at least half an inch from the rim (if not when you water it, it can overflow).

-Use a spray to clean the leaves of your plants if they have dirt on them, so they can breathe!

Tell your plants that they are awesome and that this is for their own good even if they hate you… ; ) Sun, water and love will make their day!

Now they will grow stronger than ever and produce beautiful blooms and strong green leaves!

-Mensa